

Water damage can wreak havoc on your popcorn ceiling, leading to unsightly discoloration, peeling paint, and even structural issues if left untreated.
Repairing water damaged popcorn ceilings requires a systematic approach to identify the source of the damage, prepare the area for repair, and execute the necessary steps to restore your ceiling to its former glory.
In this expert guide, we will provide you with the knowledge and tips you need to successfully repair popcorn ceiling water damage. Whether you’re a DIY enthusiast or prefer to call in the professionals, these expert tips will help you navigate the process and achieve a seamless repair. If the damage is minor, you may be able to fix it with a bit of spackle and paint.
However, in more severe cases, you may need to consider replacing the entire ceiling.
Identifying Water Damaged Popcorn Ceilings
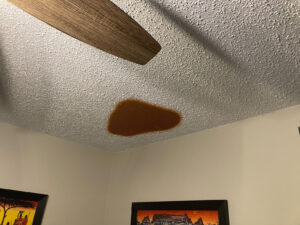 When it comes to popcorn ceiling water damage, early detection is key. The first step in the repair process is to identify the signs of water damage. Keep an eye out for the following indicators:
Signs of Water Damage
- Water damaged popcorn ceiling may exhibit water stains and discoloration. These marks can range from light discoloration to dark, noticeable stains.
- Sagging or bulging areas on the ceiling can indicate water damage. Excess moisture can cause the ceiling drywall to become weak, leading to structural issues.
- Popcorn ceiling water damage may result in a musty odor. If you notice a lingering smell, it could be a sign of water infiltration.
- Peeling paint on the ceiling can be an indicator of water damage. Water seepage can cause the paint to lose its adhesion, resulting in bubbling and peeling.
- Water damaged popcorn ceiling may feel damp or soft to the touch. If your ceiling feels moist, it’s a clear indication of water damage and the need for repairs.
Impact on Ceiling Textures
Water damage can significantly impact the texture of your popcorn ceiling. Here are some of the effects water damage may have on your ceiling texture: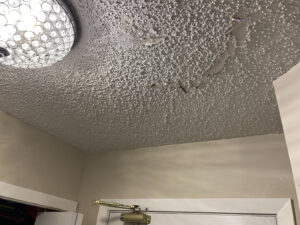
- Water damage can cause the popcorn texture to lose adhesion and peel off. This can leave your ceiling with patchy or bare areas.
- Water damaged popcorn ceiling can result in the texture becoming discolored. Stains from the water damage may be visible on the textured surface, affecting the overall appearance of the ceiling.
- Ceiling texture repair may be necessary due to water damage. In severe cases, the damaged area may need to be scraped off and retextured to restore the popcorn ceiling’s original look.
- Water damage may affect the entire ceiling texture, requiring extensive repairs. If the damage is widespread, you might need to consider repairing the entire popcorn ceiling for a uniform appearance.
- Water damage can alter the texture of the ceiling, impacting its appearance. The texture may become rough, uneven, or distorted, affecting the aesthetic appeal of the room.
Tracing the Source of the Water Damage
Before you begin repairing water damaged popcorn ceilings, it is essential to trace the source of the damage. By identifying the root cause, you can prevent further damage and ensure a long-lasting repair. Here’s how you can go about tracing the source of the water damage:
Checking for Leaks
One of the first things you should do when dealing with water damaged popcorn ceilings is to check for any leaks. Water leaks can lead to ceiling damage, so locating the source of the leak is crucial. Here are some steps to follow:
Examining the Surrounding Areas
In addition to checking for leaks, it is important to examine the surrounding areas and assess the extent of the water damage. Water damage may not be limited to the affected area, and the entire ceiling may require repair. Consider the following when examining the surrounding areas:
Preparing for the Repair Process
Preparing your popcorn ceiling for the repair process is essential to ensure a successful outcome. This involves drying the ceiling and gathering the necessary tools and supplies. Before you begin the repairs, follow these essential steps:
Drying the Ceiling
Before you can start repairing your water damaged popcorn ceiling, you need to ensure that the area is dry. It’s crucial to dry the ceiling thoroughly to prevent further damage or the growth of mold. Here’s how you can dry your ceiling:
Gathering Necessary Tools and Supplies
To successfully repair your water damaged popcorn ceiling, you’ll need the right tools and supplies on hand. Make sure you have the following items ready before you start the repair process:
- Spackle, joint compound, or drywall mud
- Putty knife, drywall knife, and taping knife
- Popcorn texture and texture sprayer or roller
- Primer and paint that matches the existing ceiling color
- Ladder, drop cloth, and plastic sheets to protect the surrounding areas
Step-by-Step Guide to Repairing Ceiling Damage
Now that you’ve prepared your popcorn ceiling for repair, it’s time to walk you through the step-by-step process. Follow these instructions to effectively repair your water damaged ceiling:
Handling the Leak Source
Before you can proceed with the popcorn ceiling repair, it’s crucial to fix the source of the water leak. Repairing the leak should be the first step in your water damaged ceiling restoration process. Here’s how you can handle the leak source:
Removing Damaged Materials
Once the water leak is fixed, you can start removing the damaged materials from your popcorn ceiling. This involves carefully cutting out the affected area and removing the damaged section of the ceiling drywall. Follow these steps for removing damaged materials:
Applying Joint Compound
After removing the damaged area, it’s time to apply joint compound to the drywall and prepare it for the new texture. Here’s how you can effectively apply joint compound to your water damaged popcorn ceiling:
Painting Over the Repaired Area
Once the joint compound has dried, it’s time to paint over the repaired area to achieve a seamless finish. Here are some tips for painting the popcorn ceiling repair:
- Prime the affected area before applying the paint to ensure proper adhesion.
- Use the existing ceiling color as a reference when choosing the paint for a seamless blend.
- Ensure that the entire ceiling is painted for a uniform look.
- Use a roller or brush to apply the paint evenly, following the texture of the surrounding popcorn ceiling.
- Allow the paint to dry completely before moving on to the next steps of the repair process.
When to Call a Professional for Ceiling Water Damage
While DIY repairs can be effective for minor popcorn ceiling water damage, there are instances where it’s best to enlist the help of a professional water damage restoration expert. Consider calling a professional in the following situations:
Evaluating the Severity of Damage
When deciding whether to call a professional for your water damaged popcorn ceiling, it is essential to evaluate the severity of the damage. Assess the following factors to determine the level of professional intervention required:
Can You Prevent Future Water Damage to Your Ceiling?
Prevention is always better than cure when it comes to popcorn ceiling water damage. By taking proactive measures, you can minimize the risk of water damage to your ceiling. Consider the following tips to prevent future water damage:
Frequently Asked Questions
How do you fix a popcorn ceiling after water leaks?
Fixing a popcorn ceiling after water leaks involves several steps.
First, repair the source of the leak to prevent further damage.
Then, scrape off any damaged or wet popcorn texture, including the stained or damaged popcorn material, using a putty knife.
Apply primer and let it dry before adding a new layer of popcorn texture with a spray gun or roller.
You can find popcorn ceiling spray at most hardware stores. Practice on a cardboard first.
Finally, match the new texture to the surrounding areas for a seamless repair and finish off by painting with color matching paint, or just paint the entire ceiling to prevent color matching problems.
Conclusion
In conclusion, repairing popcorn ceiling water damage is a task that requires careful assessment and proper execution.
Identifying the signs of water damage and tracing the source are crucial steps in the process. Preparing for the repair involves drying the ceiling and gathering the necessary tools and supplies.
Following a step-by-step guide, you can handle the leak source, remove damaged materials, apply joint compound, and paint over the repaired area. However, it’s essential to know when to call a professional, especially if the damage is severe.
Taking preventive measures can help avoid future water damage to your ceiling. Remember, with the right approach and the necessary knowledge, you can repair popcorn ceiling water damage effectively.
